Server Side Analytics: Twitter/X

To sent server to server conversion events to Twitter/X Conversion API it’s a long journey and require a lot of things, let’s start…
Requirements
You need to visit this URL in it you see a string of steps that you need to follow (and those are only the prerequisites…)
Sign up for a developer account. — for authentication
Create a developer App and secure your token. — tokens that will be used in the request
Submit a request for Ads API access for each of your developer app(s) using the Ads API Access Form. — the most fun part of the process…
Let’s start with the Developer Account, it’s straight forward you visit:
Developer Console
Use the X API with an all-new Developer Console and consumption-based billing. No fixed monthly costs, no monthly caps.
And create an account, nothing fancy here(that’s the easiest step of them all..)
Then you need to create an application for which the access will be provided and from which the token will be issued.
Heads up: When creating the Dev account and the application, you need to be logged in with the Twiiter/X account from which the ads will sent
After the app is created you will see a few tabs one of which contains the information you need:
Press enter or click to view image in full size
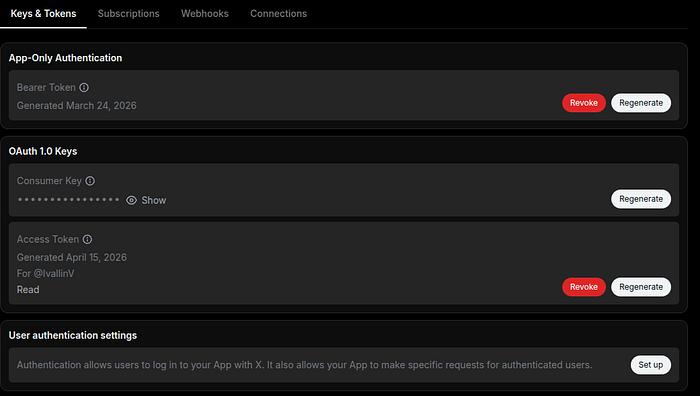
Twitter/X developer console
From it you can get what you need in terms of keys and tokens, in your env file you need to have the following:
TWITTER_ADS_CONSUMER_KEY=
TWITTER_ADS_CONSUMER_SECRET=
TWITTER_BEARER_TOKEN=
TWITTER_ADS_ACCESS_TOKEN=
TWITTER_ADS_ACCESS_TOKEN_SECRET=
Those are the main ones that you need to have in order to sent request.
Now that was the easy part…the last thing that needs to be done is to contact Twitter/X sales requesting access to the Ads API, which takes around 7–14 days give or take depending on who you got reviewing you case…
Note: Although Twitter/X claim that it’s free to gain such access the review process goes into the budged you’ve spent on ads.
After you jumped all those hoops, let’s get into the implementation.
Implementation
Twitter/X does not provide official package, so the you need to do it yourself.
Request parameters
What parameters need to be sent with the request:
conversion_time— which should be formatted:Y-m-d\TH:i:s.v\Zevent_id— the id of the event you’ve created in the dashboardidentifiers— an array containing thetwclidthat you can get from the URL when a user clicks on your ad and the hashed user email, it should be hashed withSHA256Ads API endpoint = https://ads-api.x.com/12/measurement/conversions this is the base URL when making request you need to append your Twitter/X pixel id like so: https://ads-api.x.com/12/measurement/conversions/<twitter_pixel_id>
Authorization
In order to authenticate the request you sent you need to add authorization header which needs to be constructed in a certain way using OAuth.
There is a very neat package that will do this for you TwitterOAuth it will handle everything authorization wise for you the only thing it needs are:
consumer_keyconsumer_secretaccess_tokenaccess_token_secret
use Abraham\TwitterOAuth\Consumer;
use Abraham\TwitterOAuth\HmacSha1;
use Abraham\TwitterOAuth\Request;
use Abraham\TwitterOAuth\Token;

...

$method = 'POST';
$url = 'https://ads-api.x.com/12/measurement/conversions/<twitter_pixel_id>';

$consumer = new Consumer(
      config('services.twitter_ads.consumer_key'),
      config('services.twitter_ads.consumer_secret'),
);

$token = new Token(
   config('services.twitter_ads.access_token'),
   config('services.twitter_ads.access_token_secret'),
);

$request = Request::fromConsumerAndToken(
   consumer: $consumer,
   httpMethod: $method,
   httpUrl: $url,
     token: $token,
     options: ['jsonPayload' => true],
   );

 $request->signRequest(new HmacSha1, $consumer, $token);

 // toHeader() returns "Authorization: OAuth ...", strip the prefix
 str_replace('Authorization: ', '', $request->toHeader());
After you have this you are ready to sent the request like so:
use Illuminate\Support\Facades\Http;

...

$response = Http::withHeaders([
   'Authorization' => $this->buildOAuthHeader('POST', $url),
])
  ->timeout(15)
  ->retry(2, 500, fn ($exception) => $exception instanceof ConnectionException, throw: false)
  ->post($url, [
      'conversions' => [
          $conversion
       ],
  ]);
From the HTTP client, you can get the status of the request to check if everything went smooth and maybe a try catch to place it in for anything unusual and a check if the request was successful just to be sure that it’s all good and errors or warnings were returned from the API.
Conclusion
Twitter/X conversion API it’s a great way of gathering more useful analytics data along with the Twitter Pixel, it takes a lot of time there more than hand full of requirements to gain access to it.
If you are keen to have such analytics, go with it just remember the budget used for ads can be taken into consideration during the review.
Share this post